
Locating your Olympic Electric Kiln
- Adequate space – at least 12 inches of space between the kiln and the wall. (However, for operator comfort, allow room to walk around the kiln if maintenance is required. Stackable kilns require tightening of the kiln rings while firing for proper alignment.)
- All flammable materials such as curtains, plastics, etc. in the area of the kiln should be removed. Determine room size required from the outer dimensions of the kiln you wish to purchase. For commercial kilns, check door width, and if the door is insufficient to allow kiln entry, contact Olympic Kilns to check if modifications can be made to kiln before it is ordered and built.
- Proper ventilation – Heat can accumulate in restricted areas above both gas and electric kilns if a hood is not used. If the kiln is gas and located in a confined area it is essential that an exhaust hood be place above the kiln and vented to the outside. This ensures removal of heat and exhaust gases, including carbon monoxide. Even if the kiln is outside be sure that the hot exhaust gases do not cause damage. Check all local requirements or codes before installation.
Installing Your Electric Kiln
- Position the kiln with the observation holes clearly visible and the electronic controller within easy reach.
- For kilns equipped with a power cord, place the kiln to the left of the proper electrical outlet so that the kiln can be plugged in without touching the metal jacket.
- Because all kilns generate heat the stand or frame should be placed on a cement floor. Tiles or linoleum could be damaged without this precaution.
- If the kiln is to be placed outside, ensure that moisture is not permitted. Use a roof over the kiln or some type water resistant tarp when the kiln is not being fired.
- Remember to use sheet metal or non-flammable material to shim the legs when leveling the kiln.
Electrical Hook-Up
To provide the performance it was designed to give, your new kiln must have the proper outlet and breaker to supply adequate voltage and amperage. An incorrect connection may cause disappointing or even hazardous results. A qualified electrician needs to be consulted to determine whether your wiring is adequate.
Electric kilns running on 120 volts will plug into a standard outlet but check your breaker to ensure proper performance. Standard electric kilns will run on 240 volts, single phase. If your kiln was ordered 208 volts, single or three-phase power, it will be noted on the nameplate on the kiln. Commercial electric kilns may be wired for 240, 208, 380, or 480 volts; single or three phase. Most commercial kilns require direct wiring and a receptacle outlet is not required.
Any kiln ordered three-phase will be direct wired (there is not a power cord attached to the kiln).
Please review the wiring specifications on the price and wiring charts for the kiln you intend to purchase.
Assembly of Electric Kiln
If you purchase an Olympic 120-volt, Studio Front Loader, Electric Raku, Solid Jacket electric kiln, your kiln is ready to fire upon arrival. Olympic Commercial Electric Front and Top loading and Commercial Glass Fusing kilns are assembled and ready to fire upon receipt. After the kiln is unpacked or removed from the pallet, place kiln directly on stand; or in the case of a kiln with attached frame, place the kiln where it is to be located, plug-in and fire away.
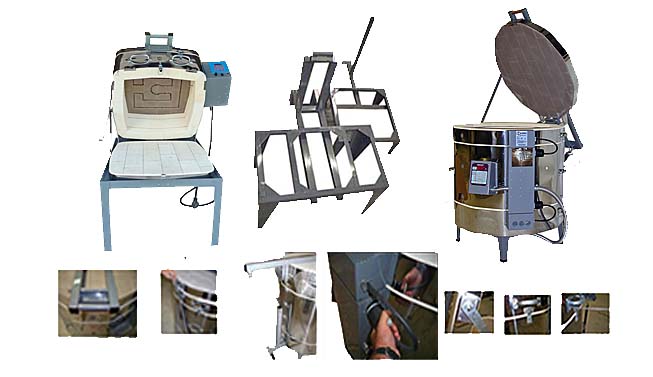
Kilns built in rings and those with counter weight lid systems must be disassembled from the shipping pallet then reassembled on the stand. The proper method is to remove the top ring and place the bottom of the top ring flat on the floor. Repeat for each section until you reach the bottom of the kiln. Place the bottom on the kiln stand with the hose clamps to the back. At this time the stand can be leveled. If shims are required to make the bottom level, or prevent rocking of the bottom on the stand, use only sheet metal under the legs of the stand. Now reassemble the kiln with the observation holes to the front and electrical boxes aligned. Grasp the rings by the outside surface and not the firebrick to avoid damaging the kiln. If the lid brace of the kiln was disconnected for shipping it should be reconnected.
For more information about installing an electric kiln with a Lid Lift Assist, please click on the links listed.